Do you wish to know how to do pin curls for beginners? Yes! You can do pin curls for beginners using hair balm, bobby pins, and a blow dryer to achieve your desired beautiful curls.
I remember back then, when I was a student at Cambridge University 8 years ago, I liked to style my hair with different curly hairstyles.
I admired how one of my friends wore curls, and it was difficult for me to curl my hair. And I wondered how I could make my straight hair curl.
Later, I discovered the pin curls method to curl hair to achieve beautiful curls.
Let me show you from my eight years of experience how I have been using the pin curls method to curl my hair to easily wear curls with my straight hair.
Know here what is the meaning of pin curls.
Let’s go.
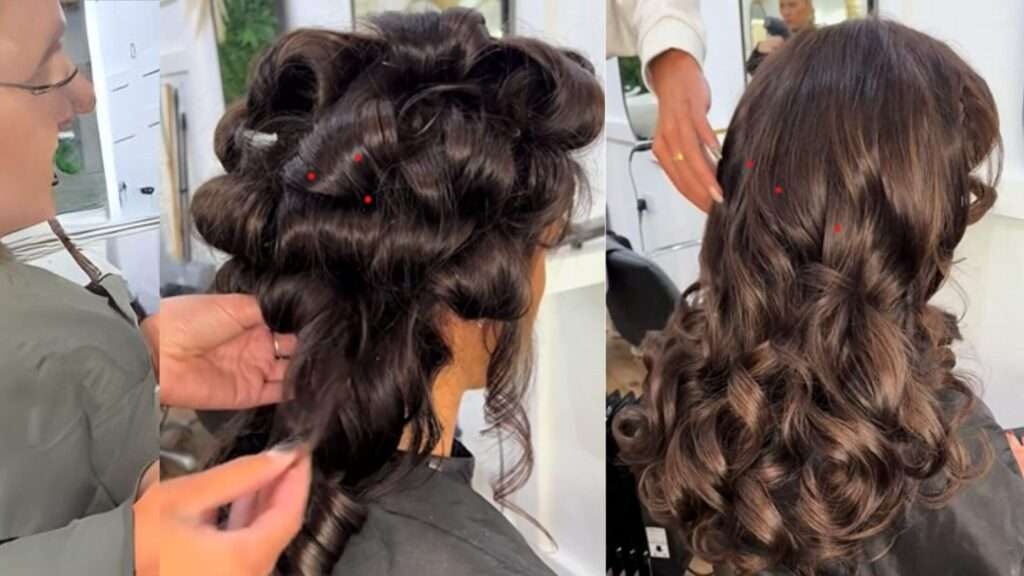
Step-By-Step Pin Curl Guide For Beginners
Naturally, curly and voluminous hair is on trend. So, it would be best to master pin curls to achieve gorgeous curls with your straight hair.
Those who already have it can celebrate, but women with straight hair must resort to special techniques to achieve the current hair trend.
Using a curling iron is always a good option, but not everyone has one at home.
It can also be difficult for beginners without heat styling tools experience to achieve curls with a curling iron and avoid hair damage.
It’s possible to achieve beautiful curls using an old-fashioned hair accessory for women – hairpins.
Here’s a step-by-step guide on how to curl hair with hairpins.
Materials Needed To Do Pin Curls For Beginners
– Comb for detangling or brush
– Hairpins or bobby pins
– Curls-enhancing products
– Heat-protective hairspray (optional)
– volumizing spray(optional)
Note: The quantity and size of the hairpins depend on the hair type. Use smaller pins for fine to medium hair and larger pins if you have thick, long hair.
Choosing pins in a different color than your hair is also helpful for easier removal.
Click here to learn how to stimulate hair growth and prevent hair loss
How To Do Pin Curls Step By Step For Beginners
Mastering the following pin curling techniques for beginners can help you create perfect pin curls for your straight hair.
Step 1: Pin curls techniques for beginners: wash your hair
Now, wash your hair using your usual shampoo and less conditioner.
The more you hydrate your hair, the harder it is to curl them.
In addition, if you can’t wash your hair, dampen it using a spray bottle.
You must know your hair must be a little wet before moving on to step two.
Step 2:Pin curls techniques for beginners: gently dry hair with a towel
Make sure to gently towel-dry your hair to remove excess water.
When you overwet your hair, use a towel to remove excess water.
Step 3: Pin curls techniques for beginners: detangle your hair
Detangle your hair thoroughly.
Now, use a comb or brush to remove any tangles on your hair that prevent you from achieving beautiful curls.
If you desire to learn how to boost hair growth at home, click here.
Step 4: Pin Curls Techniques For Beginners Use Heat-Protective
Apply a bit of heat-protective hairspray, if desired, to apply a curling iron or wand to pre-curl your hair after detangling the hair.
Using curls-enhancing products to define and set your damp hair would be best if you don’t pre-curl your hair.
Ensure you apply the product evenly from your hair root to the end.
Step 5: Pin curls techniques for beginners: Apply volumizing spray on fine hair
It is crucial you know if you have very fine hair, you can also apply a bit of volumizing spray at the roots.
Step 6: pin curls techniques for beginners: Divide hair into section
Make sure to divide your hair into sections; the number of sections you will divide will depend on your hair thickness and the number of curls you want to achieve with your straight hair.
You must know that if you create smaller sections, you will achieve tight curls; if you create large sections, you will achieve loose curls.
Start curling the hair from the top of your head.
Step 7: Pin curls techniques for beginners: Take a medium-sized hair strand and twist it lightly without pulling too tightly.
Step 8: Pin curls techniques for beginners: Roll twisted strands into a coil
Roll the twisted strand into a coil, using your fingertip to roll it to the root.
Or You can use the second pin curling tips and tricks by holding the section of hair taut with one hand and using the other to wrap your hair around your fingers.
Starting from the ends and rolling upward toward your scalp. It creates a curl or loop of hair.
Click here to learn how to use bobby pins for hair
Step 9: Pin Curls Techniques: Insert Hair Pins Or Bobby Pins
After you coil your hair against your scalp, Use two hairpins to secure the coil, forming an “X” with the pins.
Ensure that you insert your hair pins or bobby pins at an angle that crosses over your curls.
Make sure your pins hold your curls against your head.
Step 10: pin curls techniques: Repeat the process
Continue repeating this process all over your head, working from the top down. until you finish with all the sections you created with your hair.
Remember, the tighter you wrap your hair, the tighter the curl result.
Ensure the entire head is curled and pinned before the next steps.
Step 11: pin curls techniques: Dry hair naturally
Once you have pinned all your hair in place, allow it to dry naturally.
It is essential you know that you can also speed up the drying method by using a hair dryer, but using the cool setting is recommended.
Since most hairpins are made of metal, the heat from the dryer can be damaging.
Step 12: pin curls techniques: Wrap with a silk scarf
If you curl your hair at night, make sure to cover your head using a silk scarf before you sleep, with your hair pinned this way.
In addition, when you want to wear your pin curls, you can create them.
To demonstrate, If you want to wear your pin curls in the morning, do it at night and sleep with and remove your pins in the morning.
But if you want to wear it at night, do it in the morning so it can naturally dry before night to achieve a neat and dry curl.
Click here to learn how to use hair pins.
Step 13: Pin Curls Techniques: Remove Pins.
Once your hair is dry, make sure to carefully remove the bobby pins one by one. Starting from the first curl, you pin till you remove all the pins gently from the curls.
Step 14: Pin curls techniques: Use your finger to style curls
Now, gently run your fingers through the hair to loosen and define the curls.
Using your fingers and shaking them to define your curls will make it look elegant.
You must avoid using a brush or comb to prevent frizz.
Step 15: pin curls techniques: Apply hairspray(optional)
If needed, apply more hairspray all over your head to help your curls hold their shapes throughout the day.
Step 16: Pin curls techniques: Finish style
You have achieved beautiful curls you can wear for any occasion.
You know you can define your curls pinned to the side or incorporated into an updo.
It’s ready! Now, perfect your look and rock it!
Bonus trick
You can use a diffuser attachment on low heat settings to avoid hair breakage and speed up drying curls.
It is essential you know you can also sleep with pin curls.
Ensure to wear a silk scarf before sleeping; sleeping with a pins curl is a popular method among women to achieve curly hair.
Click here to learn curly hairstyles for women
How Often Should You Do Pin Curls As A Beginner?
The frequency of doing pin curls will depend on the health of your hair and how you always take of your hair.
If your hair is healthly, you can do pin curls hair any time you feel like wearing curls.
Additionally, it depends on your hair type, but generally, you can do pin curls as you like.
To illustrate, as a beginner, if you have fine hair, you can do pin curls around 1-2 times per-week, but you have to always take of your hair.
It would be best if you noticed your hair to avoid over-styling your with pin curl.
To demonstrate, if you have healthy medium hair, you can do a pin curl 2-3 times comfortably with your hair.
For example, if you have thick hair, you can do pin curls once per week because thick hair takes a longer time to completely dry.
But you can do more than once per week pin curl with your thick hair based on your available time to style your hair at home.
Pins curls without heat styling tools help you to minimize heat on your natural hair.
Doing pin curls for your special occasions can be a great opportunity to achieve beautiful curls to wear to the occasion and look gorgeous.
It is essential you know doing pin curls frequently will require you to take care of your hair to avoid hair damage and keep your hair health.
Click here to learn without heat curly hair.
How Long To Leave Pin Curls In As Beginner?
The best way you can know how long you can leave pin curls in will depend on various factors such as the thickness of your hair and your desired curl’s tightness.
Additionally, your hair type will also depend on how long you will leave pin curls in.
But generally, you have to wait for 4-5 hours before you can remove pins on your curls, or you can wear it overnight to avoid waiting for hours to dry your pin curls, and it helps to achieve well-defined curls.
For example, to dry fine hair type, you have to air dry it for 2-3 hours, But you have to consider tighter pin curl or extra settings product.
To demonstrate, if you have medium hair, you can use 3-4 hours to air dry your hair to achieve neat curls.
To illustrate, if you have thick hair, you can use 4-5 hours to air dry your pin curls. Make sure your pin hair is completely air dry to avoid frizz.
Experience with different t times to completely dry your pin curl will allow you to determine the best hours to leave your pin curls in.
Click here to learn how do you style your hair with a claw clip.
Do Pin Curls Work On Dry Hair?
No! It is not generally recommended to do pin curls with dry hair. Pin curls can’t work well with dry hair because your pins won’t hold your dry hair very well.
It can lead your hair to break because you have to use a curling iron or wand to pre-curl your hair before wrapping it into pin curls.
It is important you know If you create pin curls with dry hair, your result curl won’t be as neat and polished as doing pin curls with damp hair.
Additionally, pin curls typically work best on damp hair or slightly wet hair.
When your hair is slightly wet, it more pilable to process pin curls. It can hold curls shape better as it dries while dry hair may not hold your curls shape effectively.
Processing your pin curls with dry hair can’t last longer.
You must know the moisture on damp hair will help the hair take the curl’s shape and set properly.
To get the best outcome of pin curls. I recommend you treat your hair with curls-enhancing products before creating pin curls to avoid damaging hair.
Click here to learn a good routine for curly hair
Conclusion
Now that you have learned how to do pins curls, Please do not forget to secure your curls uniformly to achieve a neat look.
Ensure to use a bobby pin that suits your hair length and texture to achieve beautiful curls.
Remember to allow your hair to dry naturally completely before unpinning your curl to achieve awesome curl results.
Make sure to avoid creating pin curls on dry hair because it can lead your hair to breakage.
I also have an existing article stating how to get natural hair curls.